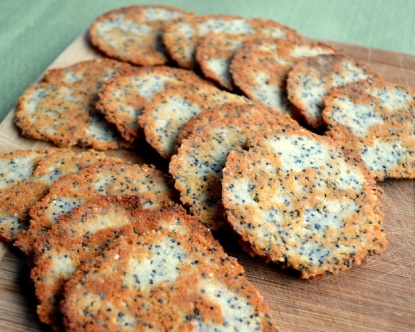
Parmesan Poppy Seed Crackers (Gluten-Free)

Homemade Crackers

You don’t have to be following a gluten-free diet to love these crackers. They are a staple in my home and are often requested when I am invited out to dinner.

Ingredients    

  • 1 cup almond meal (also known as almond flour)
  • 1/4 cup parmesan cheese
  • 3 T poppy seeds
  • 1 1/2 tsp garlic powder
  • 1/8 tsp salt
  • 1/4 tsp Dijon mustard
  • 1  egg white
  • 1 T softened butter

Directions    

Preheat oven to 325 degrees

  1. Mix together the almond meal, parmesan cheese, garlic powder, salt and poppy seeds
  2. Add the egg white, Dijon mustard and soft butter to the dry ingredients mixing everything together using a flat spatula
  3. Place small mounds, about 1 tsp each, of the mixture onto two small parchment lined cookie sheets
  4. Flatten each mound by placing a small piece of parchment paper that has been sprayed with cooking oil over top the mound
  5. Press down on the mound with a flat-bottomed glass to create a flat round cracker-sized disc
  6. Repeat with each mound until all the mixture has been used
  7. Place cookie sheets on the middle rack of the pre-heated oven and bake for 8 minutes until the crackers begin to brown around their outer edge
  8. Cool on a wire rack and store in an air-tight container

Homemade Crackers

Save

Roasted Garlic Aioli

roasted garlic

I love the mellow flavour of roasted garlic in this aioli. The roasted garlic aioli makes a great dip with fresh veggies or, it can be slathered on the bun when making turkey sliders or ground sirloin burgers. I often perk up a tuna melt or egg salad by substituting roasted garlic aioli for regular mayonnaise. No doubt you will find your own uses for this versatile sauce! Read the Quick Tip below for an easier and less time consuming version of this yummy roasted garlic aioli.

Ingredients

  • 1 whole garlic bulb
  • 1T olive oil
  • Pinch of salt
  • 1 large egg yolk (or two small yokes)
  • 2 tsp fresh lemon juice
  • ½ tsp Dijon mustard
  • 2/3 cup oil

Directions Preheat oven to 425 degrees F

  1. Brush off any loose bits of the paper-like outer coating of the whole garlic bulb. Cut the top off the whole bulb.
  2. Place the bulb on a piece of aluminum foil 6” x 6” square and drizzle 1 T olive oil down into the bulb so the oil surrounds the individual garlic cloves in the bulb.
  3. Wrap the foil around the garlic bulb, put the foil packet on a cookie sheet and place on the middle rack of the preheated oven. Bake on the middle rack of the oven for 25 minutes. Remove from the oven and open up the foil packet to let the garlic bulb cool. When you can handle it easily, separate into individual cloves and then squeeze the cloves out of their paper-like covers into a small bowl. Season with a pinch of salt and mash into a paste with the back of a metal table spoon. Set aside.
  4. Place egg yolk in the blender container with the lemon juice and Dijon mustard. Process on high speed while slowly drizzling the oil through the opening in the top of the blender cover. The oil will blend with the yolk mixture and will emulsify as you slowly drizzle it, drop by drop into the blender. You can tell the oil is emulsifying as it will turn the yolk mixture an opaque whitish colour (just like mayonnaise). Take your time with this process … it can’t be rushed!
  5. When all the oil has been incorporated into the aioli stop the blender and add the mashed garlic. Process on a high speed until the roasted garlic is completely blended into the aioli sauce.

Yield: ¾ cup Quick Tip If you are in a hurry you can do steps 1 through 3 and then simply combine the mashed roasted garlic with 2/3 cup of prepared mayonnaise and 1 tsp of Dijon mustard. This makes a fine version of roasted garlic aioli. If you want the sauce to be a bit thinner, just add 1 or 2 T of milk and mix well.

roasted garlic aioli

Turkey Slider

DSC_0016

Turkey Sliders photo by: Janet Moore

Today a cool wind blows off the Atlantic and the autumn leaves are crunchy underfoot. The days may be getting shorter but the BBQ season isn’t quite over yet! We’re eating less red meat in our household these days so turkey sliders fit the bill when a burger craving hits. Grilled onions, fresh tomato slices and Roasted Garlic Aioli add pizzazz to our sliders and the home-made Pretzel Slider Buns make these turkey burgers irresistible.

Ingredients

  • 1 lb ground turkey
  • 3 cloves minced garlic
  • ½ medium cooking onion, finely diced
  • 3 tsp seasoned salt (Montreal Steak Spice works nicely!)
  • ½ tsp ground pepper
  • 1 tsp dried thyme
  • 1 T dried parsley
  • 1 jalapeno pepper, seeded and finely chopped
  • 2 T to 3T of panko breadcrumbs (the amount you use will depend on the moisture content of your ground turkey. If it’s too moist it will be sticky and difficult to form into patties.

Directions

  1. Mix all the ingredients together making sure the onions, garlic and spices are distributed evenly throughout the ground turkey.
  2. Form meat mixture into patties that are just slightly larger in diameter than your slider buns. The patties will shrink on the grill, but not a lot as there is little fat in the ground turkey. Make the patties about a half inch thick.
  3. Coat the BBQ grill rack with some oil before cooking the patties as they may have a tendency to stick. Grill on medium high heat, about 4 – 5 minutes per side.
  4. You can also use a well-oiled grill pan on top of the stove, grilling on each side for the same amount of time.

Serve the turkey sliders on a pretzel bun with tomato slices, grilled onions and roasted garlic aioli.

Slider Sized Pretzel Buns

DSC_0040This is a Saturday morning hanging-around-the-house kind of endeavor. You can throw the seven ingredient dough together pretty quickly then tend to other chores while the dough rises. There’s a bit of fiddling with the boiling water bath but that gets done pretty quickly too. The baking soda in the boiling water is what imparts that rich brown colour we love on our pretzel buns. After that just brush with egg wash, sprinkle on the salt and pop them in the oven. Twenty minutes later you have a batch of rich golden brown pretzel buns … slightly chewy on the outside and tender soft in the middle. We love using these buns when we make Sirloin Sliders or Turkey Sliders. They make a mighty fine little sandwich as well!

Ingredients for the Buns

  • 6½ – 8 cups unbleached flour
  • 1 tsp salt
  • 1 T instant yeast (one small packet)
  • 3 ½ cups warm water
  • 2 T melted butter
  • 1 egg, beaten
  • Kosher salt flakes

Ingredients for the Pre-bake Water Bath

  • 3 quarts water
  • 1 T salt
  • 1/4 cup baking soda

Directions

  1. Combine 6 cups of the unbleached flour, salt and instant yeast together in a large bowl. Reserve the rest of flour for later use.
  2. Pour the warm water into a measuring cup. The water should not feel hot – just slightly warm against the inside of your wrist. Add the melted butter into the warm water and then combine this mixture with the dry ingredients. The combined dry and wet ingredients will form a shaggy dough.
  3. Turn the dough out onto a lightly floured surface and knead until the dough becomes elastic and the surface of the dough develops a nice shine. You will slowly add the last of the flour during the kneading process. This will take about 8 minutes.
  4. Form into a nice ball and place inside a clean, lightly oiled bowl. Swirl the dough ball around inside the bowl to get it nicely coated with the oil on all sides. Make sure the bowl is large enough to accommodate the dough when it rises, as its bulk will double in size.
  5. Cover the bowl with a clean tea towel and let the dough rise. It will take about 1 –1 ½ hours to double. I usually put the rising dough inside my oven with the light on. The heat from the oven light creates a perfect temperature for rising dough.
  6. Punch the dough down and lightly knead to remove most of the air from the dough. Divide the dough in half and make 10 small evenly sized pieces from each half (twenty altogether). Form these pieces into rounded balls and place on parchment covered baking sheets. Each ball will make a perfect, slider-sized pretzel bun. Cover loosely using plastic wrap and set aside for about 15 minutes.
  7. Preheat oven to 400°F
  8. Prepare the pre-bake water bath by combining the water, salt and baking soda in a large pot and bring this mixture to a boil over high heat.
  9. Drop 5 or six balls into the boiling bath for 6 seconds, flip them all over and boil for another 6 seconds then remove from the bath using a large slotted spoon. Place dough balls back on the baking sheets leaving enough room around each ball so it can rise while baking without touching the other balls. Continue until all the dough balls have been processed in the boiling bath.
  10. Using sharp pointed scissors nip the top of each ball in a cross pattern.
  11. Brush the top of each dough ball with the beaten egg and sprinkle with the kosher salt flakes.
  12. Bake on the middle rack of the oven for 20 – 25 minutes. The buns will turn a rich brown colour when done.

Yield 18 slider sized pretzel buns

Pat’s Thanksgiving Carrot Soup

carrot soup

Glenn and I enjoyed our Thanksgiving dinner with our good friend Pat last night. We brought the turkey, gravy and cranberry sauce and Pat did the rest. She started the meal with a spicy cumin flavoured carrot soup that not only tasted great but was low in calories. By switching a low-fat milk for the usual heavy cream this carrot soup made for a light start to our holiday meal.

Right now giant bags of carrots abound at roadside stands. Their intended use: bating deer in hunting season. But we prefer to use them on the dining table. It’s easy to make a huge batch of the carrot puree for freezing in small containers. Yummy and nutritious carrot soup is then just minutes away from the table on busy week days when the family has to eat on the run. Simply thaw the puree in the microwave before adding the milk. Reheat and ladle into bowls. If you like you can swirl a small amount of sour cream into the soup before serving. We find sour cream counteracts the sweetness of the carrots in this soup.

Ingredients

  • 2T butter
  • 1 tsp ground cumin
  • 1 tsp ground turmeric
  • 1 tsp hot sriracha chili sauce (or to taste)
  • 1 cooking onion, diced
  • 2 lbs carrots, peeled and cut into ½ inch chunks
  • 1 litre of chicken stock
  • 1 cup low fat milk
  • Low fat sour cream for garnish (1 T for each bowl)

Directions

  1. Melt the butter in a heavy saucepan large enough to hold the carrots and stock.
  2. Measure the spices and stir into the melted butter cooking for one minute.
  3. Add the onions and saute until the onion becomes translucent.
  4. Pour chicken stock into the pot and add the carrots. Raise the heat under the pot to bring everything to the boiling point then lower the heat and continue to simmer the soup mixture until the carrots are soft and cooked completely; about 20 – 25 minutes.
  5. Remove from the heat and let cool until it’s easier to handle.
  6. Puree in small batches. The puree can be completely cooled at this point and frozen in small batches for later use. Or, you can return all of the puree to a pot along with 2 cups of milk and reheat while stirring.
  7. Ladle the soup into bowls and swirl 1 T of sour cream into each bowl before serving

 This recipe serves 8

https://planetjanetkitchen.com/2014/10/14/pats-thanksgiving-carrot-soup/

DSC_0049

Turkey Pot Pie

DSC_0003

Photo by: Janet Moore

When it’s time to use up the left-overs from Thanksgiving dinner it’s hard to beat this savory recipe for Turkey Pot Pie. You can use your favorite two crust pastry recipe or, if you want to speed things up, simply purchase ready-made pie dough and you are good to go!

Yield 1 pie, serves 6

Ingredients

  • 1 potato cut into ½” dice
  • 1 cooking onion, finely diced
  • 2 celery stalks, finely dice
  • 2 carrots diced or cut into small rounds
  •  3 cloves of minced fresh garlic
  • 1/2 cup frozen peas
  • 1 tsp ground sage
  • 1 T fresh rosemary chopped fine (or 1 tsp dried, ground)
  • 1 T oregano chopped fine (or 1 tsp dried leaves)
  • 2 T fresh thyme, chopped fine (or 1 1/2 tsp dried leaves)
  • 1/2 tsp salt
  • grinding of pepper
  • 3 cups of chicken stock
  • 1 T apple cider vinegar
  • 1/4 cup plus 2T butter
  • 2 cups cubed left-over roast turkey (skin removed)

Directions

Preheat oven to 375 F

  1. Melt 2 T of the butter in a large saucepan and sauté the chopped onions, celery and minced garlic until they begin to soften.
  2. Add the rosemary, thyme and oregano. Continue to sauté while stirring for one more minute.
  3. Add the rest of the vegetables and cook the mixture, stirring frequently, until they are all beginning to soften.
  4. Now add 2 C of the chicken stock and let this mixture to come to a boil. Turn the heat down and let the ingredients simmer until the potatoes and the other vegetables cook all the way through.
  5. In a separate saucepan melt the remaining ¼ C of butter and then add the white flour. Use a whisk to stir this into a paste and continue to whisk this roux while it cooks for about one and a half minutes .The roux will turn a lovely golden brown color. Very slowly add the last cup of chicken broth whisking constantly. Continue to cook the sauce for a few more minutes until it thickens.
  6. Combine this sauce mixture with the simmering pot of vegetables while stirring constantly. Continue to simmer the vegetable mixture until it thickens into the desired gravy-like consistency.
  7. Add the cubed turkey and when heated through pour this pie filling into an already prepared 9” pie shell. Immediately cover with a pie dough top that has been previously prepared and rolled out. Crimp the edges together. Slice some openings into the top pie crust. This will let the steam escape when the pie is baking and will keep the pie from becoming soggy. Place the pie on the middle rack of the pre-heated oven. Bake for 35 to 40 minutes or until the shell hardens and turns a golden brown.

Turkey Pot Pie

Italian Sausage & Mixed Bean Soup

Bean & Sausage Soup

When the leaves begin to change colors and the nights get chilly it’s time to get the soup pot on the stove. This sausage and bean soup makes a hearty meal when served with a crusty bread and a mixed cheese board.

Ingredients

  • 1 lb. Italian Sausage (hot)
  • 3 T oil
  • 2 large cooking onions, diced
  • 1/2 cup celery, diced
  • 2 large carrots, peeled and diced
  • 2 red potatoes, peeled and diced
  • 1 quart chicken stock
  • 2 cans mixed beans (16 oz), rinsed and drained
  • 1 can plum tomatoes, diced
  • 1 can crushed tomatoes
  • 1 T white sugar
  • 1 cup yellow beans cut into one inch pieces, fresh or frozen
  • 1 cup green beans cut into one inch pieces, fresh or frozen
  • 2 bay leaves
  • 1 tsp dried thyme
  • 2 T dried parsley
  • 2 T dried basil
  • salt and pepper to taste
  • fresh Parmesan cheese shaved for garnish

Directions

  1. Roll sausage into small meatballs about 3/4” In diameter – set aside for later use.
  2. Heat the oil in a large soup pot over medium high heat.
  3. Sauté the diced cooking onion and celery until softened.
  4. Add diced carrots, diced potatoes, chicken stock, plum tomatoes, crushed tomatoes, and mixed beans – bring this mixture to the boil.
  5. Turn heat down to medium low.
  6. Add bay leaves, thyme, parsley and basil while continuing to simmer the soup over low heat for about half an hour.
  7. Place the Italian sausage meatballs, and the green and yellow beans into the soup and continue to simmer for 15 more minutes until the meatballs and the beans are cooked through.
  8. Salt and pepper to taste
  9. Serve the soup garnished with parmesan cheese

Serves 8

Italian Sausage & Mixed Bean Soup