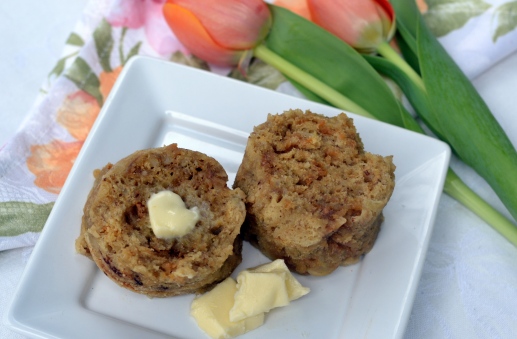
Banana Nut Mug Muffin (gluten-free)

Banana Nut Mug Muffin

Here’s an easy recipe for using up bananas that have become too ripe. I usually have several over-ripe bananas in the freezer ready for banana mug muffins or a breakfast smoothie. Ready in five minutes, this easy version of banana bread serves one. You simply mix the ingredients up in a microwavable mug and pop it into the microwave. As you know, Glenn and I are lowering our carb intake these days. Now I know banana is usually on the hit list for low carb dieters but we still eat a small amount of banana now and then. If you are watching your carb intake, this mug muffin will add 9.9 G of carbohydrates in total to your daily count.

Ingredients

  • ½ ripe banana, mashed
  • 1egg
  • 1 T melted butter
  • 1/4 tsp vanilla
  • 1 T stevia sweetener or sucralose (I use Sugar Twin Stevia Sweetener)
  • 1 T PB2 powder or 1 T peanut butter (see note about PB2 below)
  • 1 T coconut flour
  • 1/8 tsp baking soda
  • Pinch of Salt

Directions

  1. Place banana in a microwavable mug and mash into a smooth paste.
  2. Add the egg, melted butter & vanilla and mix all the wet ingredients together with a fork until well blended.
  3. Now add the rest of the ingredients (PB2 powder, coconut flour, baking soda and salt) and using the fork mix everything together right in the mug.
  4. Microwave on high for 1 1/2 – 2 ½ minutes. My microwave is 1000 watts so I use the shorter time.

Yield: 1 serving

For those who prefer to use an oven: Pre-heat oven to 350 F and bake the muffin for 15 minutes.

Note: You may be wondering what PB2 powder is. Well, it’s a mighty fine addition to the pantry for anyone who likes peanut butter but is watching their calorie intake. PB2 powder is made from slow roasted peanuts that have been pressed to remove 85% of the fat and oil. The resulting powder is full of peanut flavour and is great for use in recipes like this Banana Nut Mug Muffin.I purchase PB2 online from: The Low Carb Grocery
Save

Save

Hummus

Hummus

Hummus is another item we make often. Versions of hummus first appeared in Cairo during the thirteenth century. It’s a dish that has definitely stood the test of time and now shows up on menus all around the world. A simple dish, hummus is a spread made from five basic ingredients: chickpeas, sesame seeds, olive oil, garlic and lemon.

Ingredients

  • 1 15 oz. can cooked chickpeas, rinsed & drained
  • 4 – 6 cloves of garlic, crushed through a garlic press
  • ¼ C olive oil
  • Juice of one lemon
  • 2 tsp toasted sesame oil
  • 2 T tahini
  • ¼ tsp salt (or to taste)

Directions

Place all of the above ingredients into a blender (or food processor) and blend until the chickpeas have turned into a paste and are well blended with the other ingredients. If you use a blender you will have to stop the blender to scrape down the sides a few times until the chickpeas are broken down into a paste. Place hummus in a bowl or on a platter, drizzle with olive oil and garnish with black olives. Serve with pita bread or as a dip beside fresh veggies.

Save

Roasted Garlic

Roasted Garlic 5

Roasted garlic often accompanies meals on our table. We love it plain and unadorned and like to include freshly roasted cloves on a board of assorted appetizers when entertaining. In fact there’s a long list of recipes we make that incorporate these mellow cloves including: Garlic Aioli, Hummus (Houmous) and our homemade Low Carb Pizza. You could almost say roasted garlic is a kitchen staple at our house!

Ingredients

  • 1 whole garlic bulb
  • 1 T olive oil
  • Pinch of salt

Directions

Pre-heat oven to 400 F

  1. Brush off any loose bits of the paper-like outer coating of the whole garlic bulb. Cut the top off the whole bulb.
  2. Place the bulb on a piece of aluminum foil, 6” x 6” square, and drizzle 1 T olive oil over the bulb.
  3. Wrap the foil around the garlic bulb, place the packet on a cookie sheet and place on the middle rack of the preheated oven. Bake for 25 minutes.
  4. Remove from the oven and open up the foil packet to let the garlic bulb cool. When you can handle it easily, separate into individual cloves and remove the papery skin from each clove

Roasted Garlic

Save

Save

Cheese & Broccoli Omelette (low carb breakfast)

Cheese & Broccoli Omelette

If I have leftover veggies from the night before I’ll often throw them into a breakfast omelette the next morning. Sometimes I simply put some aside before the evening meal is served to ensure I have what I need the next morning. This morning it was broccoli but cauliflower works equally well and I’ve even used leftover squash. In fact, a squash omelette has become one of my favourites! Serve with toasted low carb bread on the side and you will have a filling breakfast that’s sure to get you through a busy morning.

Ingredients

  • 2 tsp butter
  • ½ cooking onion, small dice
  • 2 eggs
  • 3 T 18% cream
  • pinch of salt & grinding of pepper
  • 1/3 C cooked broccoli flowerets
  • 4 thin slices of aged cheddar cheese (use a cheese slicer to get nice thin slices)

Directions

  1. Melt butter in a small skillet.
  2. Add the diced onion and sauté over medium heat until the onion becomes translucent with a slight golden hue. Push the onions over to one half of the skillet and spread them around in this area evenly.
  3. Whisk the eggs and cream together with a pinch of salt and grinding of pepper.
  4. Pour the egg mixture into the skillet carefully first covering the half of the pan that has no onions and then slowly pouring the rest of the mixture over the onions in the other half of the pan.
  5. Continue to cook over medium heat until the egg mixture has set and is almost cooked all the way through.
  6. Place the cheese over the onion half of the omelette and fold the other side over the top. Continue to cook until the cheese has melted.
  7. Slip the omelette out of the skillet onto a plate and serve with toast (low carb) on the side.

Serves 1

Cheese and Broccoli Omelette (low carb breakfast)

Low Carb Pizza

Low Carb Piza

Glenn and I have decided to shed a few pounds and to that end we’ve been cutting back on carbs and increasing our protein consumption. Last night a craving for pizza consumed Glenn, so I decided to help the poor guy out and we both enjoyed this tasty treat. Of course, in keeping with our new eating plan, it’s a low carb version. I’ve adapted the cauliflower crust (yes, I did mean cauliflower!) from a Paula Deen recipe.

Ingredients

For the Crust

  • 3 C grated cauliflower
  • 1 egg, lightly beaten
  • 1 ½ C mozzarella cheese, grated
  • 2 T parmesan cheese, finely grated

For the Topping

  • ½ C tomato sauce
  • 1 tsp dried basil
  • 1 tsp dried oregano
  • 2 cooking onions, sliced into thin wedges
  • 1 T olive oil
  • 4 strips of bacon, cooked and cut into bite-sized pieces
  • ¼ C black olives (dried & cured in olive oil), stone removed & cut into small pieces
  • several roasted garlic cloves
  • Pepperoni, cut into thin slices
  • ½ C Slow Roasted Cherry Tomatoes
  • ½ C mozzarella cheese
  • 2 T parmesan cheese

 Directions

Preheat oven to 400 F

  1. Use a box grater to grate the cauliflower. Place the grated cauliflower into a glass measuring cup and microwave on high until it’s beginning to soften. It only took 3 minutes in my microwave but it’s a powerful commercial version so the amount of time will depend on the microwave you have in your kitchen. Most will probably require 7 or 8 minutes on high.
  2. This next step is crucial for a successful crust. Make sure to blot out the excess moisture from the cauliflower using a clean kitchen towel before proceeding.
  3. Now mix the partially cooked cauliflower with the beaten egg, mozzarella and 2 T of the parmesan cheese.
  4. Line a round pizza pan with a piece of parchment paper, cut to size. Coat with a quick spray of cooking oil. Spread the cauliflower/cheese mixture around evenly in the pan and place on the middle rack of your preheated oven.
  5. Bake for 25 minutes until the crust begins to turn a nice golden brown colour. Don’t turn off the oven yet!
  6. While the crust is baking, carmeilize the sliced onions over medium heat (using 1 T of olive oil). Also cook the bacon in a separate skillet over medium high heat and cut into bite-sized pieces when done.
  7. Start to layer your toppings on the crust beginning with the sauce. Sprinkle with the oregano & basil and then layer the rest of the ingredients on top ending with the mozzarella and parmesan cheeses. Place the pizza back in the oven, on the middle rack, for another 10 minutes.
  8. Remove from the oven and let cool for a bit before cutting into wedges

Slow Roasted Cherry Tomatoes

roasted cherry tomatoes

I bought some cherry tomatoes the other day and they just didn’t have much flavour. I really should know better than to buy tomatoes at this time of year! So, what to do with the disappointing red orbs that looked so promising and tasted so blah? I decided to sprinkle some thyme and a drizzle of olive oil over the little tomatoes and roast them in the oven at a low temperature to see if that would perk them up a bit. Here’s the end result. They were pretty tasty after all! I roasted them for about 45 minutes at 300 F.

The daily dispatch summary

Well this isn’t really about recipes or food but … my cousin is on a BIG adventure and regularly posts about her experiences. Check it out!

Leeward View

This is a LOOONNNGGGG post.  It is simply a summary of the daily dispatch emails I was able to send out on our recent passage from Fort Lauderdale to Saint Martin. Bill and I hired Dale Stock to skipper us on our delivery and we had Bill’s friend Matt Silver sail with us.  Dale left us in St. Martin and Matt’s wife Mary flew down to sail with us to Nevis.

To be sure I have lots of little stories and experiences to share in future posts but it will take me some time to do the full download from my head to the computer.  We are at the cottage on Nevis now, and like all seasonal homes there is a LOT of work to do to get the cottage comfortable for living.  As I put this post together I am enjoying the sounds of local donkeys, goats, and evening…

View original post 2,061 more words

Popovers

Popovers in Pan

Popovers are a classic. My mom used to make these to accompany a Beef Roast which often graced our family table for Sunday dinner. Nowadays I am likely to serve these any old day of the week. I made the popovers pictured here just last night. Beef Barley Soup was on the menu and I felt the need for something extra on the side and these popovers came together quickly. We ate them with the soup and smeared some butter and jam on the leftover popovers for dessert!

Ingredients

  •  3 T melted butter
  • 2 eggs
  • 1 C milk
  • 1 C unbleached white flour
  • ½ tsp salt

Directions

Pre-heat oven to 400 degrees F

  1.  Brush the inside of your muffin tin with melted butter and place on the middle rack of your preheated oven while you mix up the rest of the ingredients. The secret to getting a nice and high popover is to have the buttered pan hot when you add the batter. Use about 1 T of the melted butter.
  2. Place the rest of the ingredients, including what remains of the melted butter, into a blender and process on high until all the ingredients are well mixed.
  3. Remove the hot muffin pan from the oven and fill each muffin cup about half way up with the batter.
  4. Place back into oven on the middle rack and bake for 18 – 20 minutes until the popovers have risen and are a nice golden brown colour.

Yield 6 – 8 popovers (depending on the size of your muffin pan cups).

Popovers