Quinoa and Sweet Dumpling Squash

dumpling squash

This side dish is the perfect way to serve quinoa and roasted squash. The sweetness from the squash and the nutty flavour of the quinoa combine beautifully. Add that bit of tang supplied by the fresh lemon juice and you have a quick and easy side dish to complement a variety of entrees. I like to pair this quinoa and squash with pork tenderloin, roast chicken or baked salmon.

Ingredients

Preheat oven to 400 F

  • ½ sweet dumpling squash, peeled and cut into small dice
  • 1 ½ T olive oil
  • ½ tsp dried thyme
  • Sprinkle of Kosher salt flakes & grinding of pepper
  • 1 cup quinoa
  • 2 cups broth (chicken or vegetable)
  • ½ cooking onion finely chopped
  • ¼ cup chopped parsley
  • 1 T freshly squeezed lemon juice

Directions

  1. Toss diced sweet dumpling squash (should be about 2 cups) with 1 T of the olive oil, dried thyme, salt and pepper making sure the squash is evenly coated with all the ingredients.
  2. Spread the squash mixture out in a single layer on a baking sheet and place on the middle rack of the pre-heated oven and roast until soft (about 25 – 20 minutes)
  3. Bring 2 cups of broth to boil over high heat.
  4. Add the Quinoa and turn the heat down to medium low and let the quinoa simmer, covered for about 20 minutes or until all the broth has been absorbed and the quinoa is light and fluffy. Remove from heat.
  5. Heat the remaining ½ T in a small skillet set over medium heat. Add the cooking onion and dried thyme to the heated oil and sauté until the onion is soft and golden in colour.
  6. Combine the roasted squash, cooked quinoa, onion/thyme mixture, chopped parsley and lemon juice in a medium sized serving bowl and toss until all the ingredients are evenly mixed together. Correct the seasonings and serve!

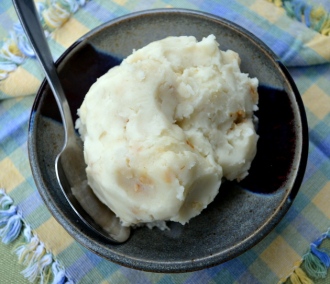
Garlic Mashed Potatoes

DSC_0002

Who can resist this most comforting of the comfort foods? Garlic mashed potatoes might take a bit more fussing than simply throwing a few spuds in the oven for an hour so, but the end result is well worth the effort.

Ingredients

  • 4 large potatoes
  • ¼ cup butter
  • 1/3 cup heated milk
  • 3 large cloves of garlic, minced
  • Salt & Pepper to taste

Directions

  1. Peel potatoes and cut into medium sized chunks.
  2. Place potatoes into medium sized saucepan and cover with lightly salted water over high heat.
  3. When water boils turn heat down to medium high and continue to boil until potatoes soften and are cooked through (about 15 minutes).
  4. While the potatoes are boiling melt the butter in a small skillet over medium high heat and add the minced garlic.
  5. Sauté the garlic in the butter until the garlic and the butter begin to brown slightly. Watch this mixture closely as the garlic and butter can go from slightly brown to burnt and bitter very quickly!
  6. Drain the potatoes, place them back in the pot and add butter/garlic mixture. Mash together until the potatoes, butter and garlic bits are well mixed.
  7. Add the heated milk and continue to mash and mix until everything is light and fluffy.
  8. Season with salt and pepper to taste.

DSC_0012

* All photos used on Planet Janet Kitchen belong to the author and photographer, Janet Moore and may not be re-posted without permission.

Balsamic Mushrooms

DSC_0006

I often use these sautéed mushrooms as a tasty garnish for main course dishes like beef stew, meat loaf and baked salmon. The rich deep flavour of the mushrooms is heightened by the sweet and acidic tang of good quality balsamic vinegar.

Here’s another tip worth paying attention to. If you want the mushrooms to sauté properly and not become rubbery make sure to use a skillet that is large enough to hold all the mushrooms in a single layer. If you crowd them into a skillet that is too small, the mushrooms will tend to steam in the juices that they release when heated. The end result will be somewhat rubbery mushrooms that are less than stellar!

Ingredients

  • 1 T olive oil
  • 2 T butter
  • 1/4 cup finely chopped shallots
  • 1/2 lb mushrooms chopped into coarse chunks (white button mushrooms or Portobello mushrooms)
  • 1 tsp dried thyme
  • 3 T balsamic vinegar

Directions

  • Heat olive oil and butter in a skillet over medium high heat until the butter has melted.
  • Add the shallots and sauté for 2 minutes until the shallots soften and are beginning to become translucent.
  • Turn the heat down to medium and add the coarsely chopped mushrooms and dried thyme to the hot skillet and continue to sauté until the mushrooms are beginning to soften and darken in colour.
  • Drizzle the balsamic vinegar around in the pan and continue to sauté the mushroom mixture until the vinegar has been absorbed into the mushrooms.
  • salt and pepper to taste and remove from heat.

DSC_0012

* All photos used on Planet Janet Kitchen belong to the author and photographer, Janet Moore and may not be re-posted without permission.

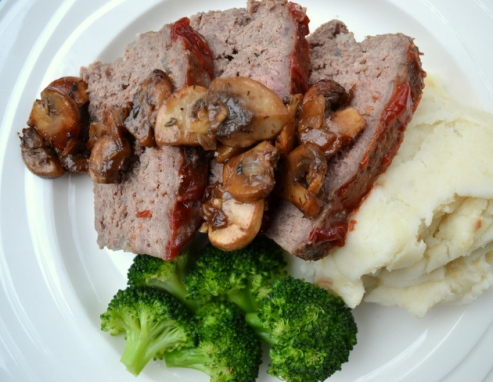
Meat Loaf

DSC_0056

Meat Loaf Photo by Janet Moore

Humble though it may be, meat loaf is a regular item on our dining-room table mid-week. We will often serve it topped with sautéed balsamic mushrooms and a side of garlic mashed potatoes. Add a vegetable and dinner is done in no time. Even better, left-over meat loaf makes a spectacular sandwich the next day when lunchtime rolls around!

Ingredients

  • 1 lb. lean ground beef
  • 1/2 large cooking onion, finely chopped
  • 1/4 cup panko bread grumbs
  • 1 T garlic powder
  • 1 tsp salt
  • 1/2 tsp pepper
  • 1/2 tsp thyme
  • 1 egg, lightly beaten
  • 1/4 cup ketchup (or BBQ sauce)

Directions

Preheat oven to 350 F

  1. Mix all of the ingredients (except the ketchup) together. Although it’s kind of squishy, getting your hands right in there and massaging the mixture until it’s thoroughly blended is probably the best way to get the job done!
  2. Place the meat mixture in an appropriately sized bread pan and press along the top to form a shallow dent that runs from end to end.
  3. Fill this shallow dent up with the ketchup, spreading the ketchup evenly over the top of the loaf.
  4. Bake in the preheated oven for 50 minutes or until done.
  5. Meat loaf is done when a meat thermometer inserted into the middle of the loaf reaches 160 F

DSC_0029-002

Low Carb, Sugar-free, Gluten-free Cheesecake

Photo by Janet Moore

How’s that for a mouthful! Our local Arts Council hosts a yearly variety show to raise funds for the Peter Oliver Scholarship. This scholarship, named for a man who was famous for mentoring young actors in our small town, helps young people embarking on studies in the arts. This year I am one of the organizers. We serve a variety of cakes, sweet squares and cookies during the intermission. People, in our community, flock to the United Church basement to enjoy the entertainment and to savour the half-time treats. Today I baked a low carb, gluten-free, sugar-free cheesecake for the event.

For those of you who can’t eat sugar and are trying to be gluten-free this easy to make cheesecake just might fit the bill when you get a craving for something sweet. The crust, made with a mixture of ground almonds and ground pecans adds rich flavour and the creamy smooth texture of the cheesecake filling won’t disappoint!

You may be wondering why I have used a number of different sugar substitutes in this recipe. I have found that the end result is simply better when doing so. Each sugar substitute has a slightly different flavour. The stevia can sometimes have a bitter after-taste, the xylitol feels almost cool as it dissolves in the mouth and the sucralose can be almost overwhelmingly sweet on it’s own. I’ve discovered that when I mix them altogether in one recipe the end result is simply better flavour!

Ingredients

For the crust:

  • one cup ground pecans
  • 1 cup ground almonds
  • 1/4 cup stevia blend (I used Sugar Twin brand)
  • 2 T melted butter

For the Filling:

  • 3 – 8 oz packages of cream cheese
  • 1 cup 18% coffee cream
  • 1/2 cup sucralose
  • 1/2 cup xylitol
  • 1 T vanilla
  • 2 large eggs

For the Topping:

  • 1/2 cup thick plain yogurt
  • 2 T sucralose
  • 1 tsp vanilla
  • 1 1/2 cup fresh raspberries

Directions

For the crust:

Preheat oven to 350

  1. In a bowl combine the ground almonds, ground pecans and the stevia blend.
  2. Add the melted butter and mix together.
  3. Place this mixture into an 8”, non-stick, spring-form cake pan.
  4. Pack the mixture firmly and evenly around the bottom of the pan letting it rise slightly up the sides.
  5. Place in the preheated oven for 5 minutes only. Remove from oven and set aside. Do not turn the oven off!

For the filling:

  1. Cut the softened cream cheese into smaller pieces and place into a large mixing bowl.
  2. Add the 18% coffee cream, sucralose, xylitol and vanilla. Beat, using a hand mixer on high speed until everything is well blended, light and fluffy.
  3. Add the eggs one at a time and continue to beat on high speed until the eggs are well incorporated into the mixture.
  4. Turn the cream cheese filling into the crust lined spring-form cake pan.
  5. Bake in the oven for 30 – 35 minutes until done.

For the Topping:

  1. Let the cheesecake cool completely inside the spring-form cake pan.
  2. Mix yogurt, sucralose and vanilla together until well blended.
  3. Spread evenly on top of the cooled cheesecake.
  4. Arrange fresh raspberries on top of the yogurt mixture. The thin layer of yogurt will keep the raspberries in place!

The cake can be covered with plastic wrap right inside the cake pan and stored in the refrigerator until you are ready to serve it. Run a breadknife carefully around the outside edge to loosen the cake before releasing the spring.

Cheesecake: Photo by Janet Moore

* All photos on this website by Janet Moore